churro User Guide
Churro is a data ingest application framework, allowing end users to provide data in the form of files or APIs that get processed by churro pipelines. The types of input data sources include JSON APIs, CSV, XML, XLS, and JSON files for example. The churro framework allows for other file types to be supported.
Multiple pipelines can be created which act as a data ingest processor. The pipelines watch for incoming files and performs pipeline processing on them. Typically, pipeline processing completes with ingested data being added to a pipeline’s consolidated database. Pipeline processing includes data transformations.
More significant data processing logic can be added using churro framework features. These concepts and more are detailed within the following links:
- Pipelines
- Transform Functions
- Transform Rules
- Certificates
- Pipeline Users
- Extract Sources
- Extract Data Samples
- Authentication
- User Authorization
- sftp Client Setup
First Steps
Pipelines
Pipelines are application components that process ingested data including the persistence of the processed data.
A Pipeline is defined as a k8s Custom Resource on a cluster. When churro creates a Pipeline, it creates a unique k8s Namespace for the Pipeline, and then creates a Pipeline Custom Resource within that namespace. Information about the Pipeline is found in the Custom Resource, for example the TLS certificates that the Pipeline uses to secure communications into the Pipeline.
Pipelines can be defined to process categories of data either by data type or by data ownership or any other combination you want. Each pipeline exists in its own k8s namespace so it is separate from other pipelines having its own set of resources.
In churro, a Pipeline is defined in a k8s namespace and consists of various churro application components. The pipeline reacts to how it is configured by the churro end user. For example, you can have the Pipeline watch for certain files, and transformation actions when new files are found on the file system.
End users can access the Pipeline’s target database, in this case a cockroachdb database which is used to hold all the data processed by the Pipeline.
End users can manage churro Pipelines using the churro-ui web application.
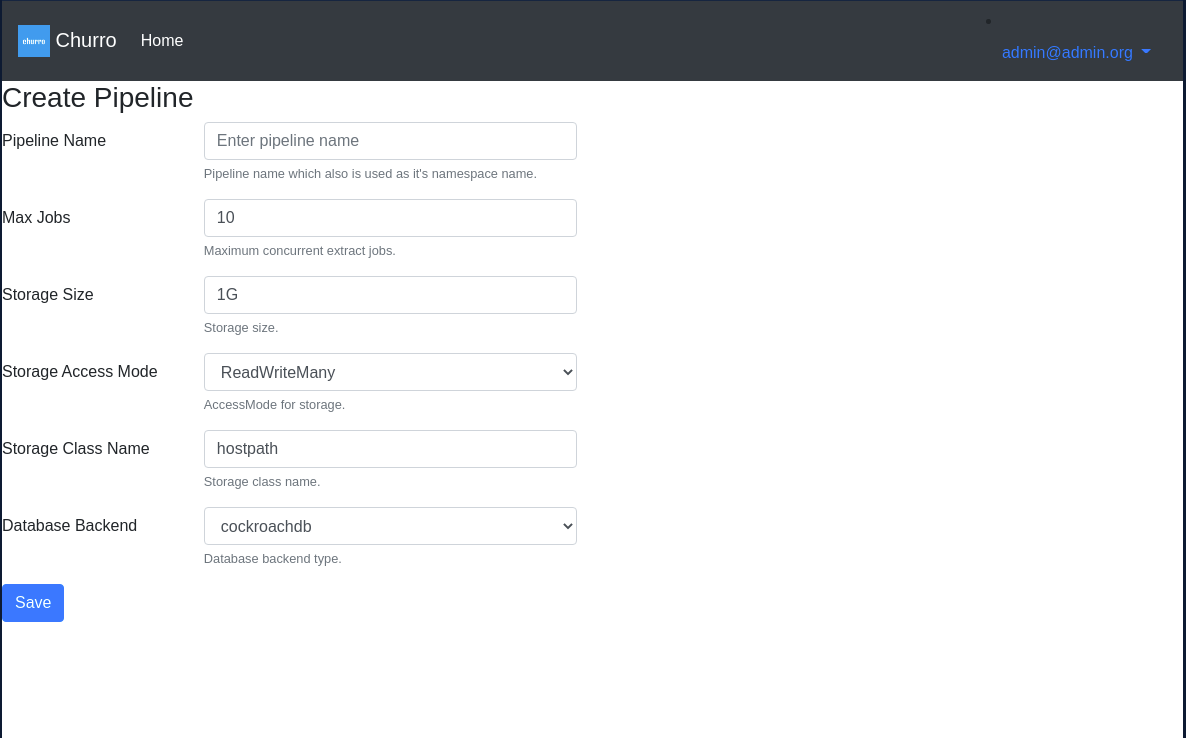
Here is a screenshot of the pipeline create page:
Transform Functions
Transform functions are churro transformation logic that are defined within a given Pipeline. This logic is used to transform input data files data into another format if necessary. Today, churro supports golang based Transform Functions. End users of churro can define Transform Functions for a Pipeline using the churro-ui web application. Transform functions are just logic essentially and are not invoked until you define a Transform Rule which uses this logic.
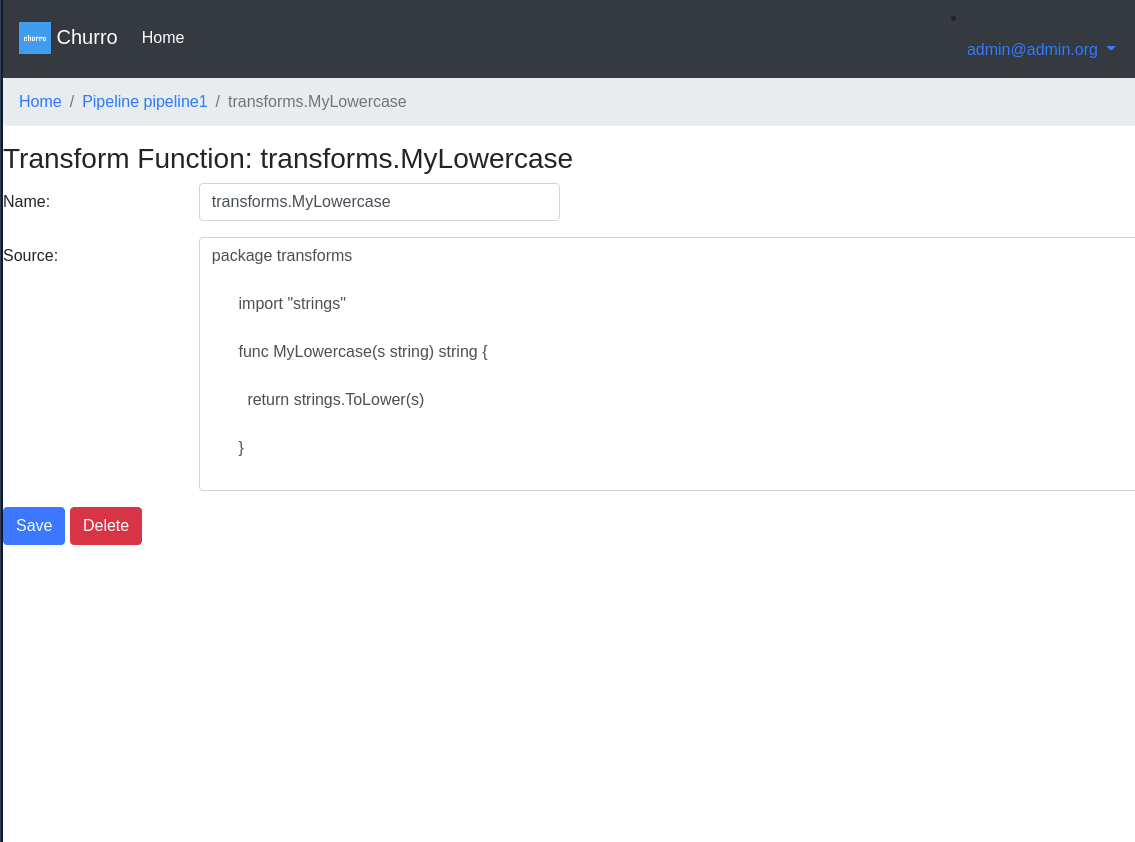
Here is a screenshot of an example transform function:
Transform Rules
Transform rules define a transformation rule for a given data input type. That rules specifies a Transform Function that will be executed.
The Transform Rule specifies a path within the input files that the rule will be applied to. Transformed data is ultimately written to the pipeline’s target database (e.g. cockroachdb).
Certificates
Various TLS certficates are used by churro to secure its microservices and other application components.
Database Certficates
cockroachdb certficates are stored in each pipeline’s namespace within k8s Secrets. The Secrets are named:
- cockroachdb.client.root
- cockroachdb.node
These certificates are generated by the churro-operator when it deploys a Pipeline.
Microservice Certificates
The churro microservices, namely churro-watch and churro-ctl implement gRPC interfaces which let other services access them and make RPC calls. These services are secured with the certficates found in the churro.client.root k8s Secret.
The churro-operator generates these certificates when it deploys a new Pipeline. These certificates are stored within the churro Pipeline k8s Custom Resource for a given Pipeline.
churro-ui Certificate
The churro-ui web application serves content using TLS certificates named:
- https-server.crt
- https-server.key
Pipeline Users
Users within churro are defined at the churro application level, and then also at the Pipeline level.
You first create a churro user using the churro-ui. Then you grant that user access to a specific Pipeline once the Pipeline is created.
Users can either own a Read, Write, or Admin privilege. Privileges in churro work this way:
| Priv | Within churro | Within a Pipeline |
|---|---|---|
| Read | Read pipelines | Read pipelines |
| Write | Update pipelines | Update a pipeline |
| Admin | create pipelines | Administer a pipeline |
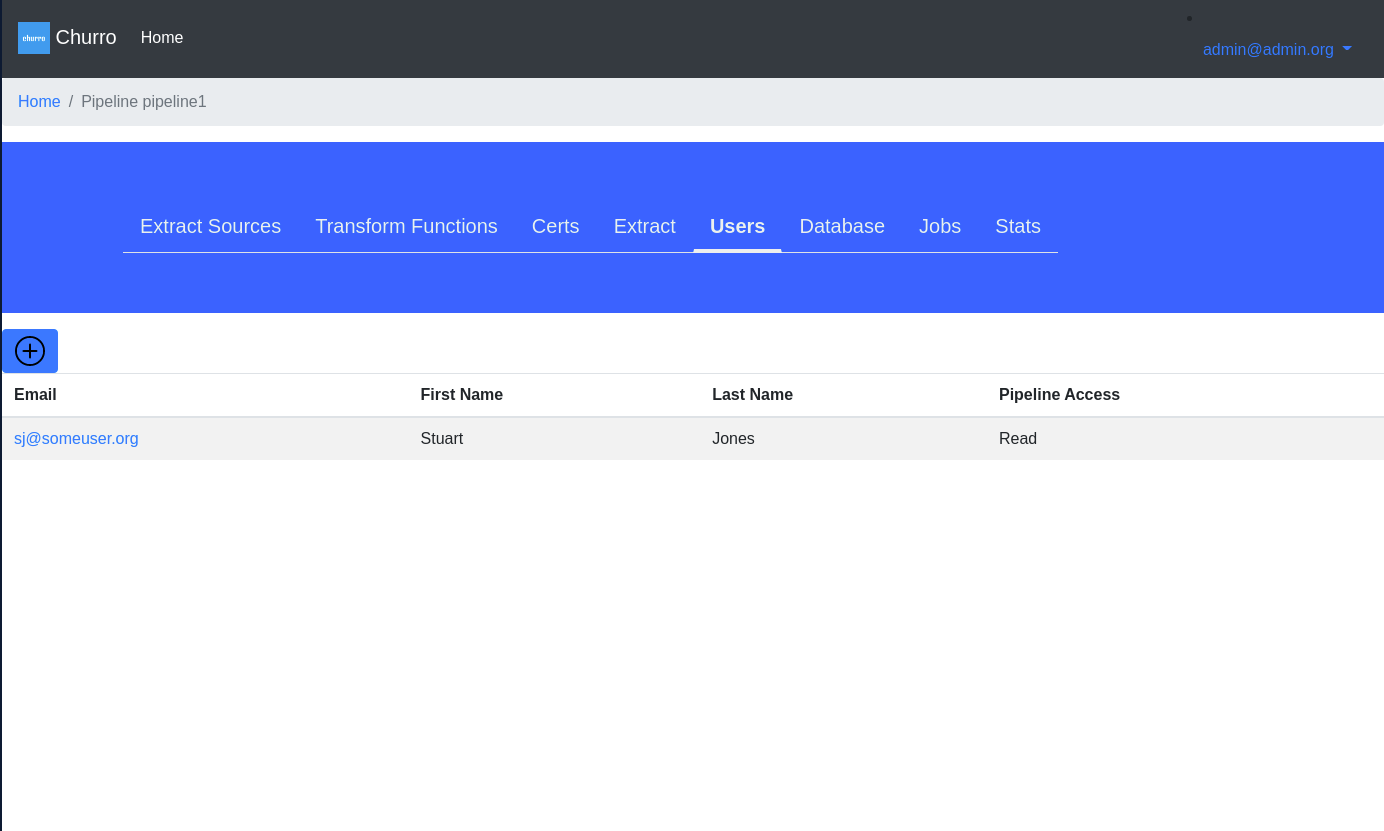
Here is a sample screenshot of a pipeline’s users:
Extract Sources
Extract Sources are defined for a given Pipeline and allow you to watch file system directories for certain file types to be created or read from JSON APIs. As those data sources are read by churro, it results in data being ingested into the pipeline database created by churro.
In the case of file processing, you define a data source for a given file type and specify a regex expression to identify the files. churro has a persistent volume directory mounted to accept files. This offers a means of integrating files into churro, you essentially copy files into a known path in churro to have churro process them. You can also upload a file from churro web console to process a file on demand.
You specify a directory path into which you would copy files for churro to process. As churro processes these files, it will rename the file after it processes it to avoid trying to process it a 2nd time. Currently, it is up to the administrator to make sure the directory doesn’t fill up its space and to remove processed files to free up space.
As files are created in the watched directory, churro-watch will create worker processes to process the input files, transforming their data, and loading it into the pipeline’s target database (e.g. cockroachdb instance).
In the case of a Data Source being a JSON API, you define the API endpoints in the Data Source and churro will then create a churro-extract Pod that will read from that API endpoint until you stop the Pod.
Extract Data Samples
End users of churro using the web interface can extract samples of a pipeline’s data.
Inside churro-ui, users can click an Extract button within a Pipeline to cause churro to extract a sample of all the Pipeline’s target database tables into a sqlite database file which users can download to their desktop.
End users can then use sqlitebrowser or the sqlite3 CLI to examine on their laptop a sample of the loaded Pipeline database.
Authentication
End users of churro will require a churro administrator create a user account within churro.
End user accounts use an email address for the ID. The administrator can also set a user’s initial password.
End users can use the churro-ui to change their password. The churro-ui login page will prompt the user for an ID and password. If the authentication is successful, a cookie is written on the user’s browser to allow a defined time for the user to work in churro, eventually the session will timeout and the user will have to re-authenticate.
User Authorization
End users are granted 1 of 3 roles which control authorization within churro.
Read, Write, and Admin are the current churro roles that can be granted. Think of Admin as a super-user role. The Read role only allows a user read access to churro data or pipeline configurations. The Write role lets a user update or change a pipeline configuration.
sftp Client Setup
sftp is a fairly mainstream means to upload or transfer files to and from different hosts. In churro, we have included an sftp service within the churro-watch Pod to enable an easy means for users to upload data files directly into churro Data Source file folders.
How it works
Within the churro-watch Pod, we include a new container, this container will run the sftp server from text. We have configured this sftp server to mount the same file folder that crunchy-watch uses to process uploaded data source files (e.g. CSV, JSON, Excel, XML).
sftp User Configuration Example
The sftp service includes a web console that allows you to define sftp users. We use this console to add a churro user account that we will use to upload data files.
First, generate a unique key as follows:
ssh-keygen
This will create a public and private key such as /home/yourname/.ssh/[id_rsa, id_rsa.pub]
Within the sftp web console, we create a user that specifies the public key contents you generated. You will also want to set the data directory to be /data, this is where the churro-watch data source directory is mounted within the sftp container. This mounted volume is shared with the churro-watch container.
sftp Client Configuration
Next, we create a sftp config file (e.g. config.sftp) that can be used on the client host that a user would use to upload files to churro. The config file looks like this:
Host localhost
User test2
IdentityFile /home/jeffmc/.ssh/id_rsa
You can upload files using sftp by using a command as follows:
sftp -F /home/yourname/config.sftp -P 2022 test2@yourhost
After connecting, you can look around the file directory that churro-watch uses to find data files to process:
sftp> cd csvfiles
sftp> ls
ready                                   source1.csv.churro-processed
sftp> put source1.csv
The put sftp command uploads a file source1.csv from your current local client directory to the remote server directory. Effectively this will cause churro-watch to process the uploaded file.
Creating Your First Pipeline
To create your first pipeline in churro, follow these steps:
Login to churro
You will navigate to https://churro-ui:8080 or similar as defined by your churro administrator, your admin will provide you an initial churro login credential
Create Pipeline
Your admin might have already created you a pipeline, if so, you’ll click on the pipeline you want to view. If you need to create a Pipeline and have churro Admin rights, you would proceed to click on the Create Pipeline button.
Note that it takes roughly a minute or longer for the pipeline to start up and become functional. Until the pipeline shows a green status symbol, you can assume the pipeline is not functional.
Configure the Pipeline
Transform Functions
Define any transformation functions that you want to be accessible to the whole pipeline. Your admin might have already pre-populated this set of transform functions for you, if not, then you can enter the functions you want. Later on, these functions will be referenced within any transformation rules you create for the pipeline.
Transform Rules
On the Transform Rules tab, you can define transformation rules that pertain to a given data scheme (e.g. CSV, XML). These rules then would get applied to any Watch Directories that specify those data schemes.
Transform Rules leverage the Transform Functions you might have defined.
Extract Sources
On the Extract Sources tab you can define what sort of input files or JSON APIs you want to watch for within this pipeline.
For example, if you want to have this pipeline process comma separated files, you would create a Data Source that specifies the CSV scheme. Files processed that match that scheme would have their data loaded into the pipeline’s target database.
See Extract Sources for more details.
Certs
You can download the certificates used by the Pipeline on the Certs tab. This is a feature only Admins can perform because it effectively gives you access to the security certificates used to secure this pipeline.
This feature for example would allow you to access the cockroachdb that is running within this particular pipeline.
Extract
On the Extract tab, you can click on the Extract button to download a sqlite3 database to your local host. That sqlite3 database contains a small extract of all the database tables that are defined for this pipeline.
Users can view the sqlite database using a graphical tool like sqlitebrowser which you can install on most host systems.
Users
On the Users tab, you can assign churro users to have access rights to this pipeline. Only the users defined in churro are able to be added onto this list of pipeline users. You need Admin rights to add users to a pipeline.
Test the Pipeline
With your pipeline configured with at least one Data Source, you can use the Upload button on the Data Sources page to upload a single file to the Data Source’s file system. For example, if the data source directory is configured for watching CSV files, upload a sample CSV file from your localhost to churro.
When you do this, churro will create a churro-extract pod on your kubernetes cluster to process the uploaded file.
You can also click on the Extract button (on the Pipeline detail page) to pull down a sample of your uploaded file after it has been processed.
You will see the Stats are updated to show the processed file as well.